If you’re getting into WordPress, you’ve probably seen just how powerful it can be. Just a heads-up, though – this tutorial is for WordPress.org users, not WordPress.com. If you’re curious about the difference, check out “What is WordPress?” for the scoop.
As you set up your WordPress site, you might run into some memory limits that can be a bit frustrating. You might be wondering, “Why does my site need more memory?” Well, as you add plugins, themes, and tons of content, your memory needs can really start to climb, making it super important to know how to increase memory limit WordPress.
If your memory limit is too low, you could see some annoying errors pop up, like “Allowed memory size exhausted.” Trust me, that’s not the kind of thing you want to deal with. But don’t sweat it! Learning how to increase memory limit WordPress is easier than you might think and can really boost your site’s performance.
In this guide, I’ll show you some simple steps to increase memory limit WordPress without any hassle. Whether you’re a coding pro or just starting out, these tips are easy to follow. A few tweaks here and there can keep your site running smoothly and efficiently.
Table of Contents
Why Does My Site Need More Memory?
You might be asking yourself, “Why does my site need more memory?” Well, it all comes down to what you’re adding to your site. Every time you install a new plugin, switch up your theme, or upload images, your memory usage goes up.
Think of it like your backpack on a hiking trip. The more gear you pack—like snacks, a water bottle, and an extra jacket – the heavier it gets. Similarly, as you add more features and content to your WordPress site, it requires more memory to run smoothly.
Plus, if you’re running an online store, a membership site, or anything that needs to handle lots of traffic, you’ll definitely need that extra memory. More visitors mean more requests to your server, and without enough memory, your site could start lagging or, worse, crash.
In short, giving your site the memory it needs helps it perform better, load faster, and keep your visitors happy. And who doesn’t want that?
How to Increase Memory Limit WordPress
If you’re looking to boost your WordPress site’s performance, increasing the memory limit is a great place to start. Luckily, this process isn’t as complicated as it sounds. Let’s walk through the steps together, and you’ll have your site running smoother in no time.
Step 1: Check Your Current Memory Limit
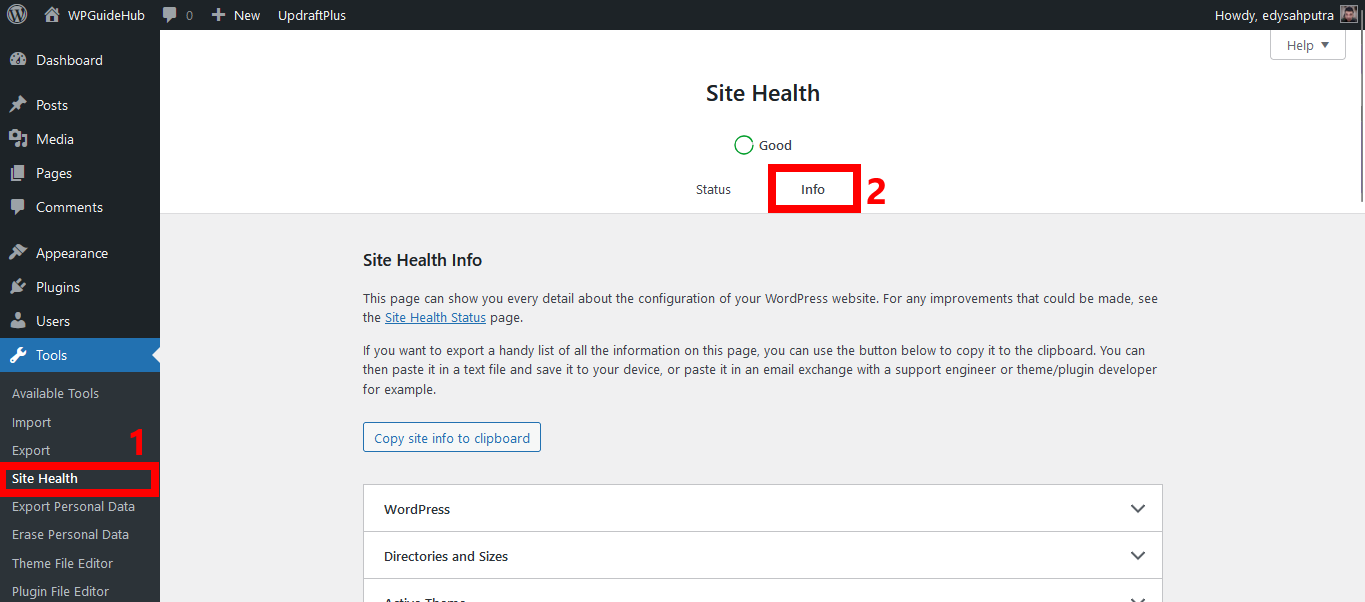
Before you make any changes, it’s a good idea to see what your current memory limit is. You can do this by accessing your site’s dashboard. Head over to the Tools section and then click on Site Health.
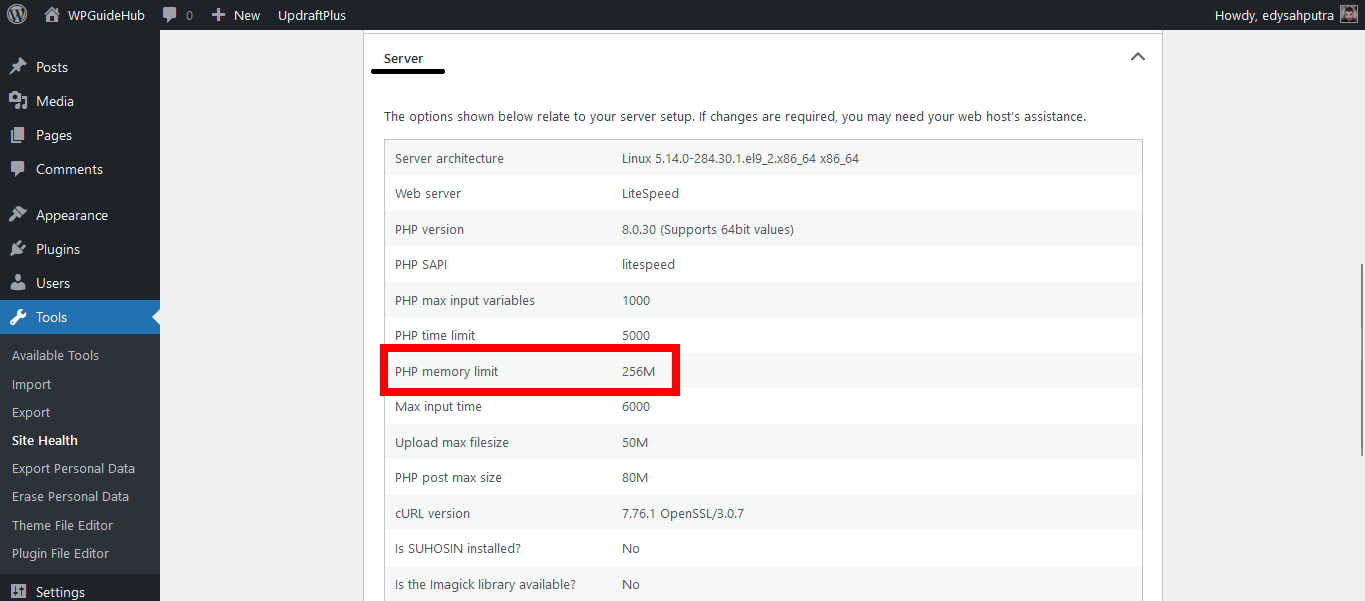
From there, look for the Info tab, and under Server, you’ll find your current memory limit listed. This gives you a baseline to work from.
Step 2: Modify the wp-config.php File
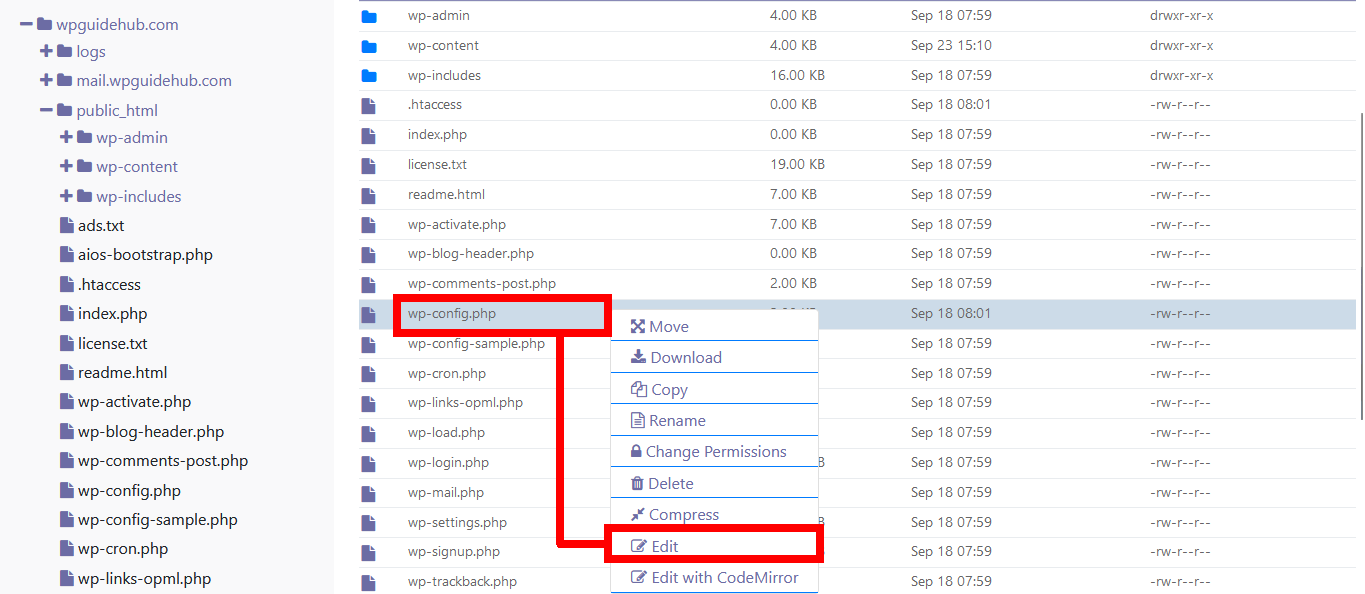
One of the easiest ways to increase memory limit WordPress is by modifying the wp-config.php file. To do this, you’ll need to access your site via FTP or use the File Manager in your hosting control panel. Once you’re in, locate the wp-config.php file in the root folder of your WordPress installation.
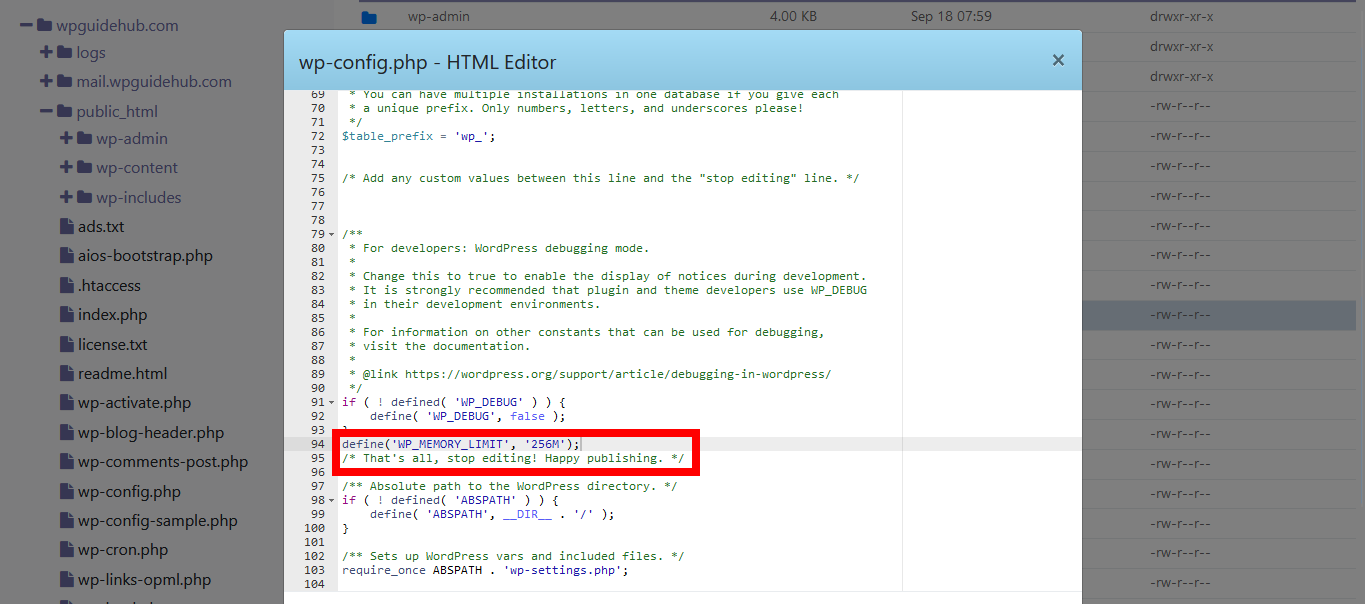
Open the file with a text editor, and just before the line that says “That’s all, stop editing! Happy blogging,” add the following code:
define('WP_MEMORY_LIMIT', '256M');This line increases your memory limit to 256MB. You can adjust the number based on your needs, but 256MB is usually a safe bet for most sites.
Step 3: Adjust the php.ini File (If Necessary)
If modifying the wp-config.php file doesn’t do the trick, you might need to change the php.ini file. This file controls the settings for PHP, which is what runs WordPress. Again, access your site via FTP or the File Manager.
Look for the php.ini file in the root directory or inside a folder named php or cgi-bin. If you don’t see it, you can create a new file and name it php.ini. Open this file and add the following line:
memory_limit = 256MSave the changes, and you should be all set!
Step 4: Update .htaccess (If Needed)
Sometimes, you might need to update your .htaccess file to increase memory limit WordPress. This file is also found in the root directory. Open it with a text editor and add this line at the top:
php_value memory_limit 256MMake sure to save your changes. This step is often only necessary if you’re using a shared hosting environment.
Step 5: Check Your Changes
After making these changes, it’s time to check if they’ve taken effect. Go back to the Site Health section in your WordPress dashboard and look at the memory limit again. If all went well, you should see the new limit reflected there.
Step 6: Troubleshoot (If Necessary)
If your memory limit hasn’t changed, don’t worry! It might be due to server settings or limitations set by your hosting provider. In that case, you can reach out to their support team and ask them to increase your memory limit. They’re usually pretty helpful and can guide you through the process.
Conclusion
And that’s it! You’ve just learned how to increase memory limit WordPress with a few simple steps. If you find that your hosting provider doesn’t allow you to increase the memory limit, it might be time to consider switching to managed WordPress hosting.
One great option is Nexcess. They specialize in managed WordPress hosting, which means you get a service that’s optimized for WordPress out of the box. With features like automatic updates, enhanced security, and superior support, Nexcess makes it easy to keep your site running smoothly and efficiently. Plus, their infrastructure is designed to handle high traffic loads, ensuring that your site stays fast and responsive no matter what.
If you want to explore more about managed WordPress hosting options, check out my post on “Top Managed WordPress Hosting“. It could be the perfect solution for all your hosting needs!