How to Backup Your WordPress Site – If you’re managing a website on WordPress, you already know how powerful this platform can be for sharing your ideas and building an online presence. But let’s face it: running a website comes with its own set of challenges, especially when it comes to keeping your content safe. That’s why having a solid backup plan is crucial.
Now, you might be thinking, “Isn’t my web hosting provider already backing up my site?” Many popular hosting services, especially managed WordPress hosting providers like Nexcess, do include backup features in their hosting packages. While that’s fantastic, having your own backup is a brilliant idea for several reasons. First, relying solely on your host’s backup means you’re at their mercy. If there’s an issue on their end, you might not have immediate access to your files. Plus, those backups may not be as frequent or comprehensive as you’d like.
This is where a dedicated backup solution like UpdraftPlus comes in. Not only does it allow you to create backups on your own terms, but it also gives you the flexibility to store them in various locations – whether it’s cloud services like Google Drive, Dropbox, or even your local computer. Having your own backups means you can restore your site quickly and easily, regardless of what happens on your hosting provider’s side.
In this post, I’ll walk you through how to back up your WordPress site using UpdraftPlus. It’s super user-friendly and will save you tons of time compared to manual backups. Plus, with features like automatic scheduling, you won’t have to worry about remembering to do it yourself.
But first, let’s clarify something important: we’re focusing on WordPress.org here, not WordPress.com. If you’re curious about the differences, be sure to check out my other post, “What is WordPress?” for more info.
Ready to take the plunge and secure your website? Let’s get started!
Table of Contents
How to Backup Your WordPress Site
Backing up your WordPress site is one of the best things you can do for your online presence. It’s like having insurance for your digital content. Let’s dive into the step-by-step process using UpdraftPlus, one of the most popular backup plugins available. Trust me, it’s easier than you think.
Step 1: Install UpdraftPlus
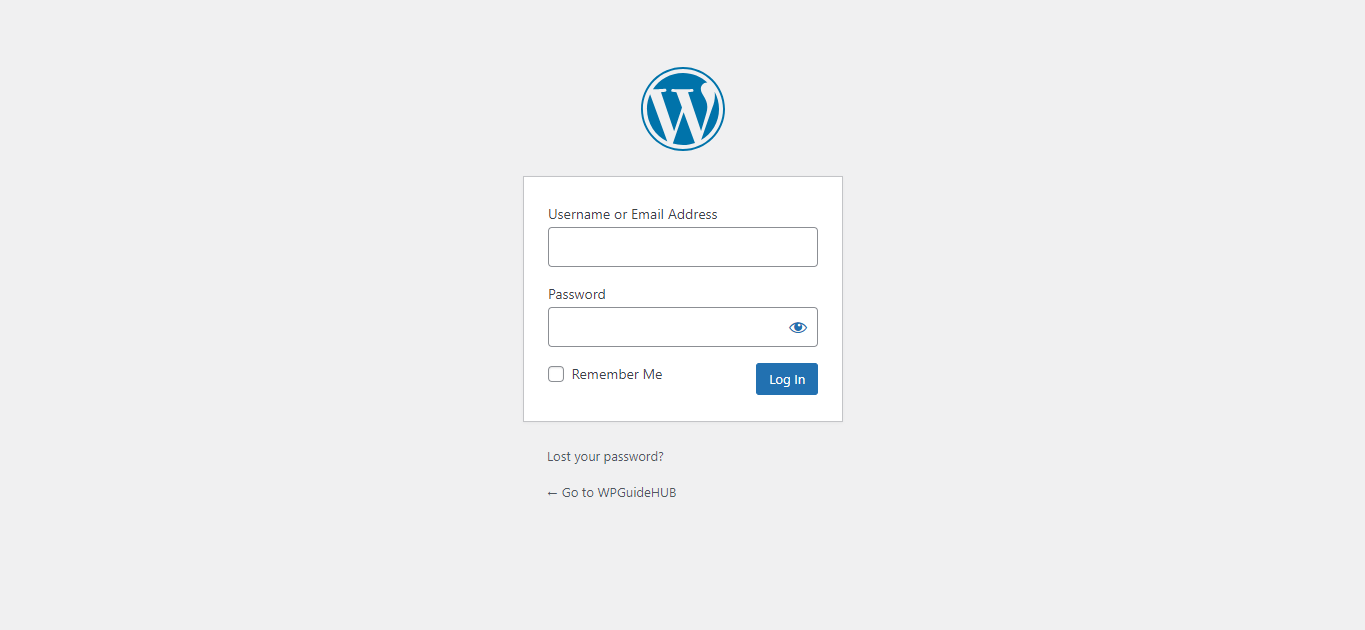
The first step to securing your WordPress site with reliable backups is installing the UpdraftPlus plugin. So, let’s get started! First, you need to log in to your WordPress dashboard. You can do this by navigating to yourwebsite.com/wp-admin, replacing “yourwebsite.com” with your actual domain name. This will take you to the login page where you can enter your username and password.
If you’ve forgotten your login credentials, don’t worry! You can reset your password easily. Check out my other post on How to Reset Your WordPress Login Password for a step-by-step guide. Once you’re logged in, you’ll be greeted by the main dashboard, which is your command center for managing all aspects of your site.
Now, look for the “Plugins” section in the menu on the left-hand side. Click on “Add New” to access the WordPress plugin repository. This is where you can explore thousands of plugins to enhance your site’s functionality. In the search bar, type “UpdraftPlus” to find the plugin quickly.
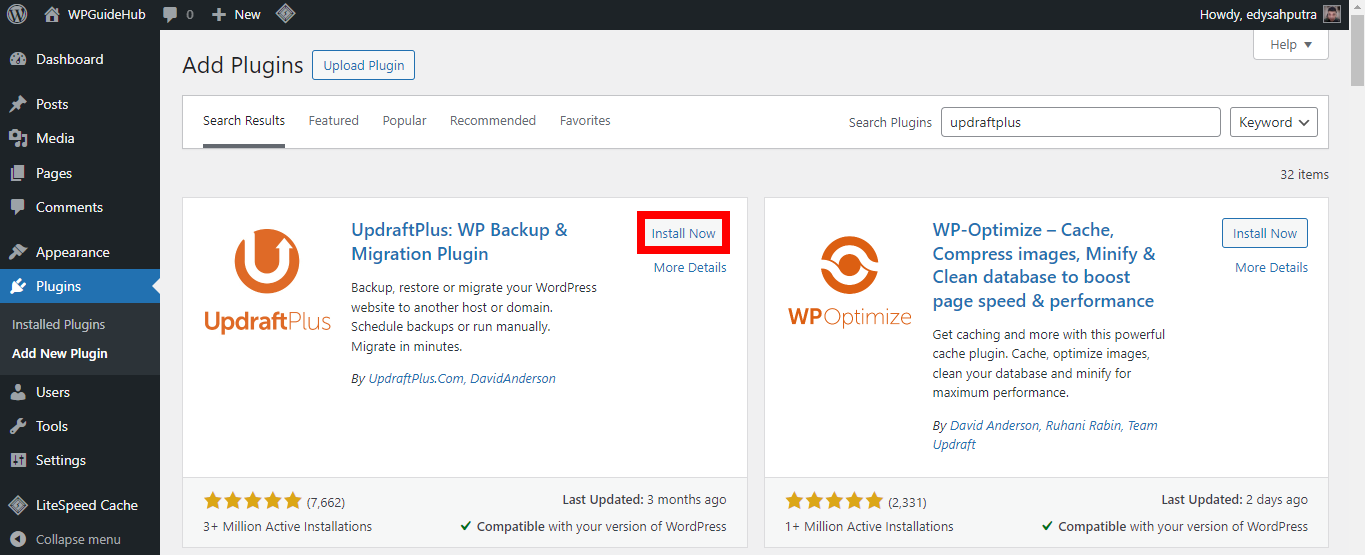
When UpdraftPlus Backup/Restore appears in the search results, click the “Install Now” button. It may take a few moments for the installation process to complete, so hang tight. Once it’s finished, the button will change to “Activate.” Go ahead and click that to activate the plugin. Just like that, you’ve taken your first step toward securing your website.
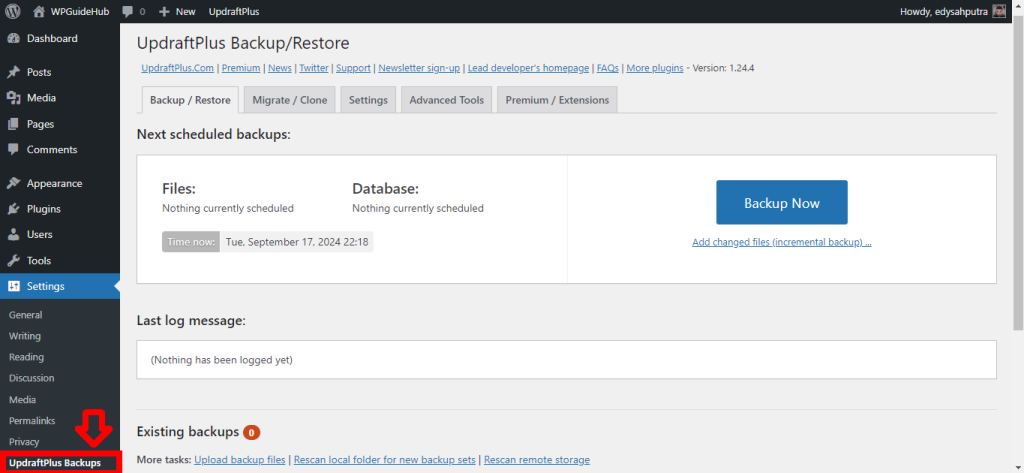
After activation, you’ll notice a new menu item in your dashboard labeled “Settings.” Hover over it, and you’ll see “UpdraftPlus Backups” appear in the dropdown. Click on that, and you’ll be directed to the UpdraftPlus settings page, where you’ll be able to configure your backup options.
Step 2: Setting Up Backup Schedule and Remote Storage
Now that you’ve installed UpdraftPlus, it’s time to set up your backup schedule and storage location. For this tutorial, we’ll be saving our backup files to Google Drive, which is a smart choice for keeping your files safe and easy to access.
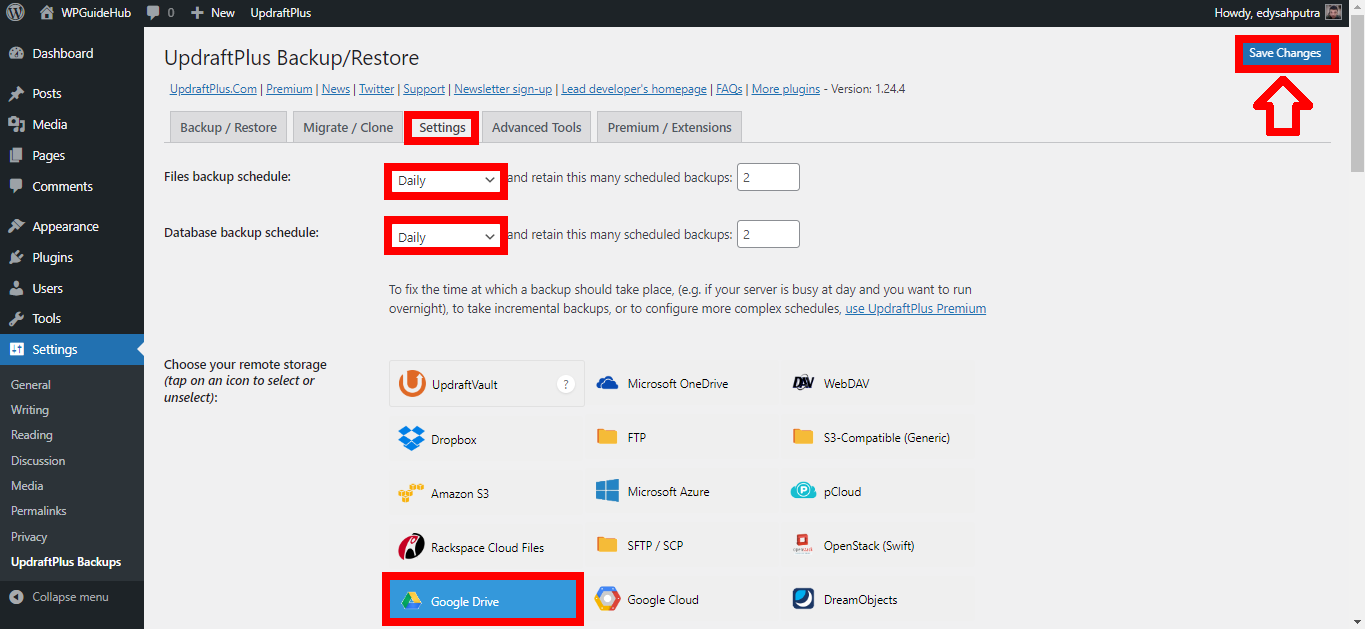
On the UpdraftPlus backup/restore page, head over to the “Settings” tab. Here, you can set up your automatic backup schedule for files by choosing the “Files Backup Schedule” and deciding how many scheduled backups you want to keep. Then, scroll down to configure the database backup schedule and set how many of those backups to retain as well. Next, in the “Choose Your Remote Storage” section, just click on the icon of your preferred storage option; for this tutorial, I’m going with Google Drive, so I click the Google Drive icon. Once you’re all set, just hit the “Save Changes” button in the top right corner, and you’re good to go!
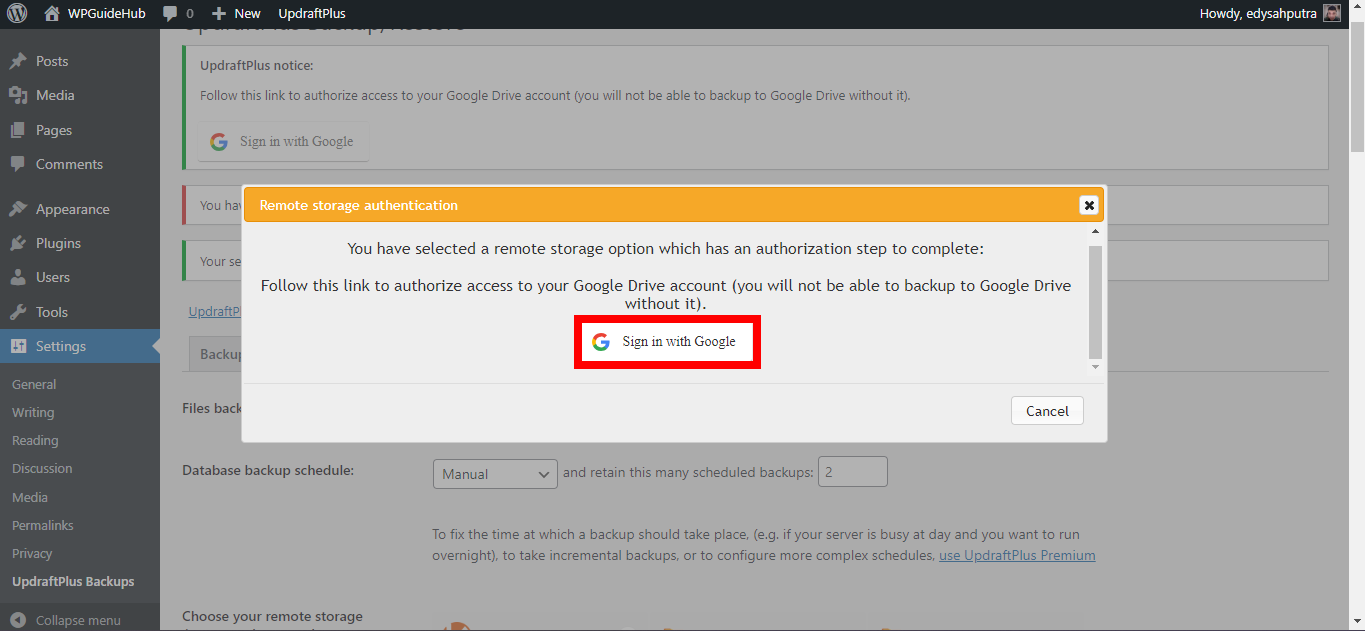
After that, a box will pop up with a button to authenticate your remote storage. Just click that button, log in to your remote storage, and grant all the necessary permissions that the UpdraftPlus plugin needs.
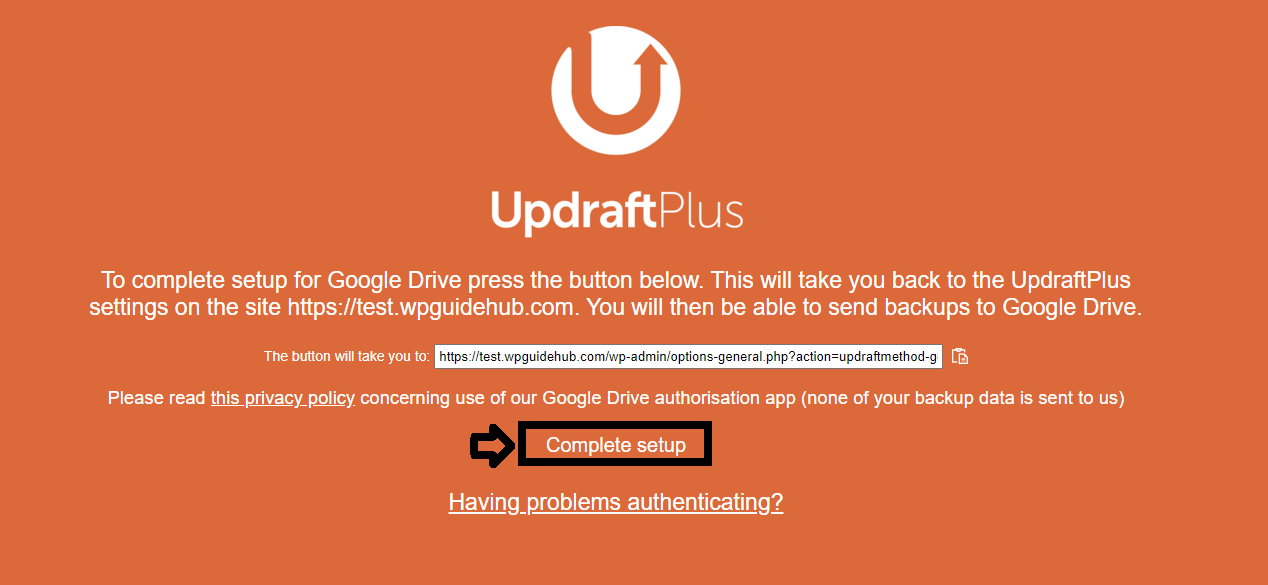
Once you’ve granted access, you’ll see a screen like the one in the image above. If that’s the case, just go ahead and click the “Complete Setup” button.
Step 3: Create Your First Backup (Full Backup)
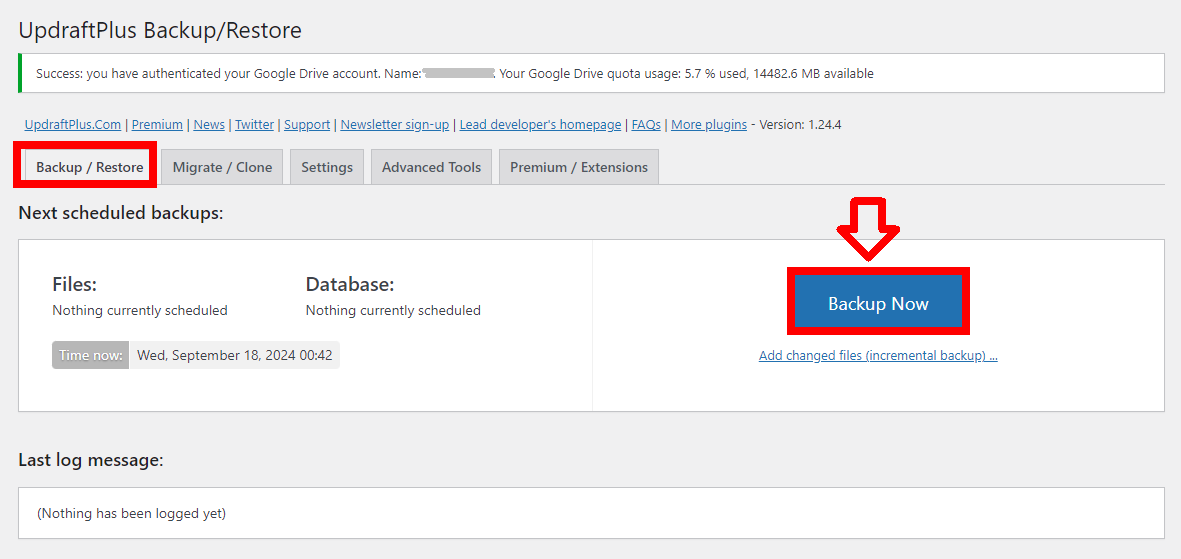
Now, you’ll be taken back to the “Backup/Restore” tab. From there, just click the “Backup Now” button to create your first backup.
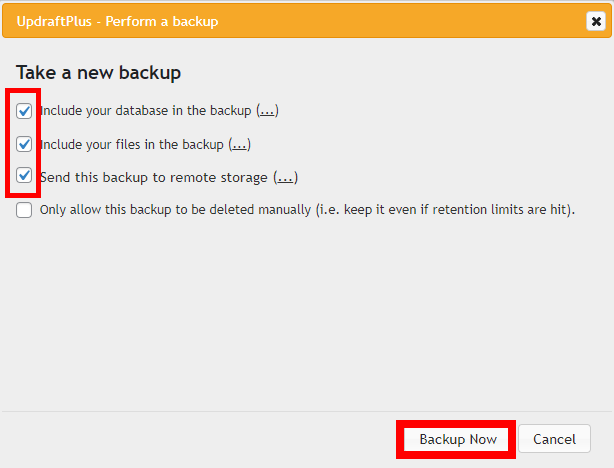
Next, you’ll see a few options. Since this is your first backup, I highly recommend going for a full backup. So, check the first three boxes and then click the “Backup Now” button to start the process. This will back up your entire WordPress site, and all files and databases will be automatically stored in the remote storage you set up earlier.
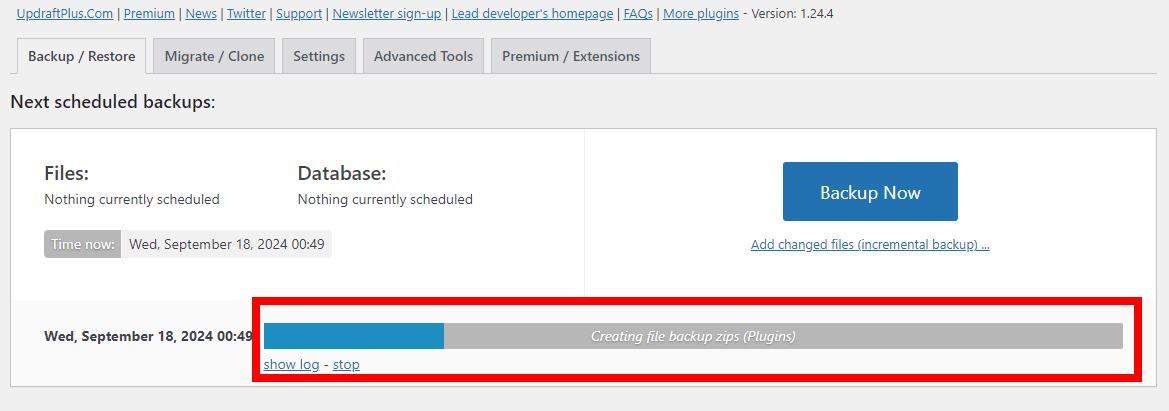
Then, you’ll see that the backup is in progress, and the backup files will be saved to your remote storage. Just sit back and wait for the backup to finish. This process usually depends on how many files your WordPress site has, so it might take a little while.
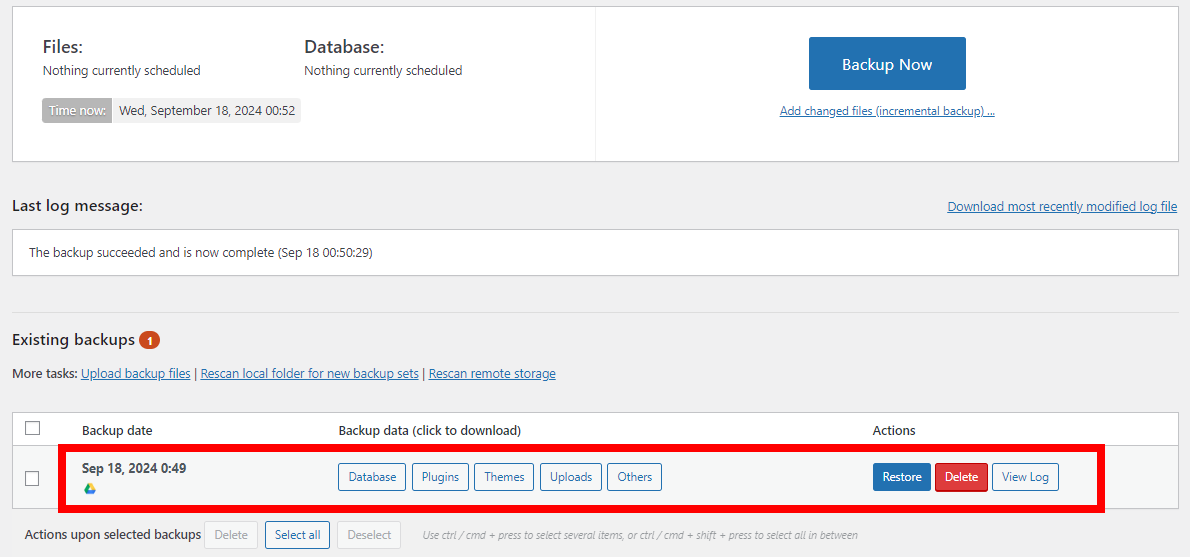
Once the backup is completed and saved to your remote storage, you can find your WordPress site backup in the “Existing Backups” section.
How to Restore Your Backup
If you encounter issues with your WordPress site (like a fatal error) or if you’re switching to a new hosting provider, you can easily restore your site using the backup you created earlier. First, install a fresh WordPress on your new or old hosting. Then, install and activate the UpdraftPlus plugin. After that, connect UpdraftPlus to the remote storage where your WordPress backup files are stored.
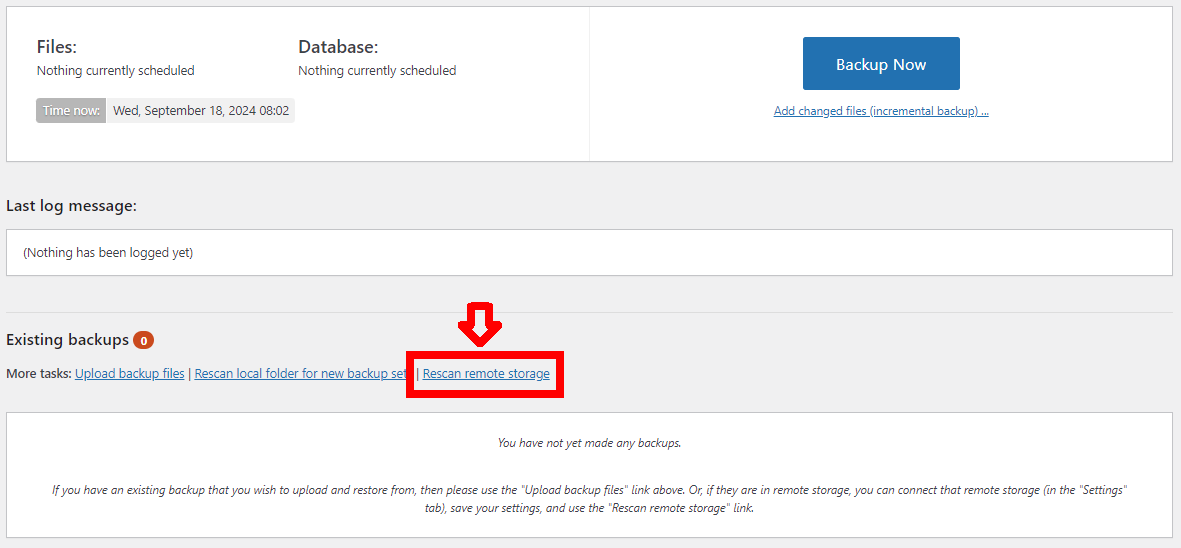
After connecting the plugin to your remote storage, you might not see your backup files listed under “Existing Backups.” No worries! Just click on the “Rescan Remote Storage” option to refresh the view and find your backups.

After that, just click the “Restore” button next to the backup file you want to restore.

Next, choose which components you want to restore. If you want to restore your WordPress site completely, check all the boxes and then click the “Next” button.
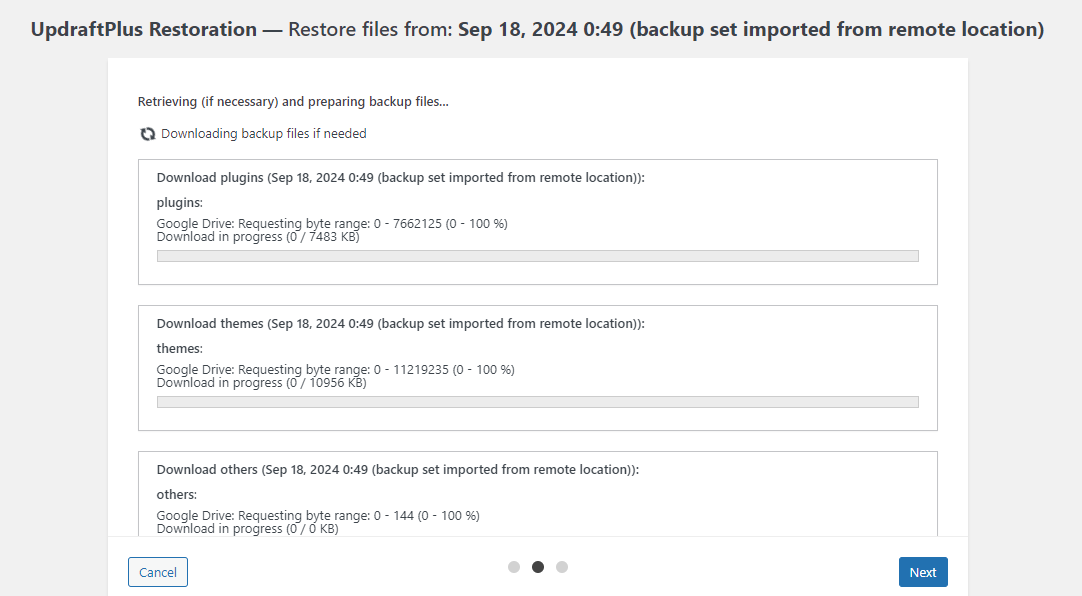
Next, you’ll see the plugin downloading your WordPress backup from your remote storage. Just wait for it to finish, and make sure not to close your browser tab during the process.
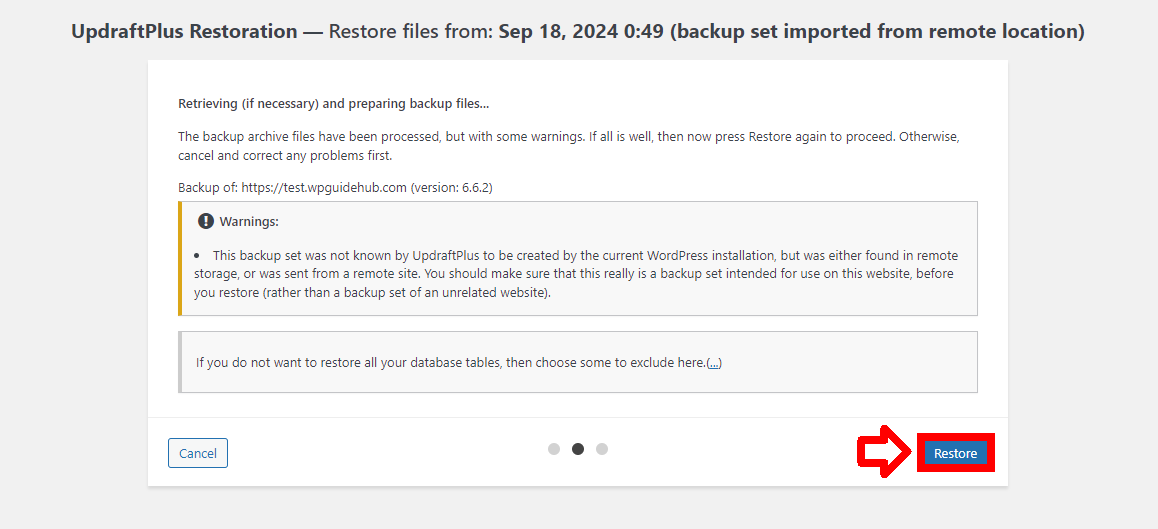
Once the download is complete, click the “Restore” button to start the restoration process.
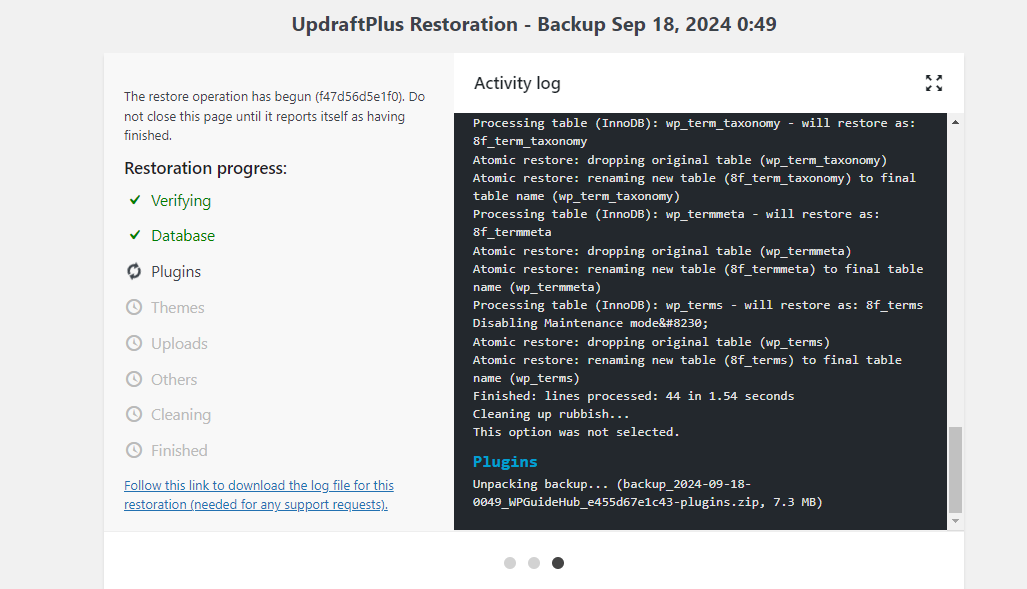
Then, the UpdraftPlus plugin will restore your WordPress site. Just wait for the process to finish. During the restoration, you might see a popup asking you to log in. If that happens, simply log in using your old WordPress username and password to continue the restoration.
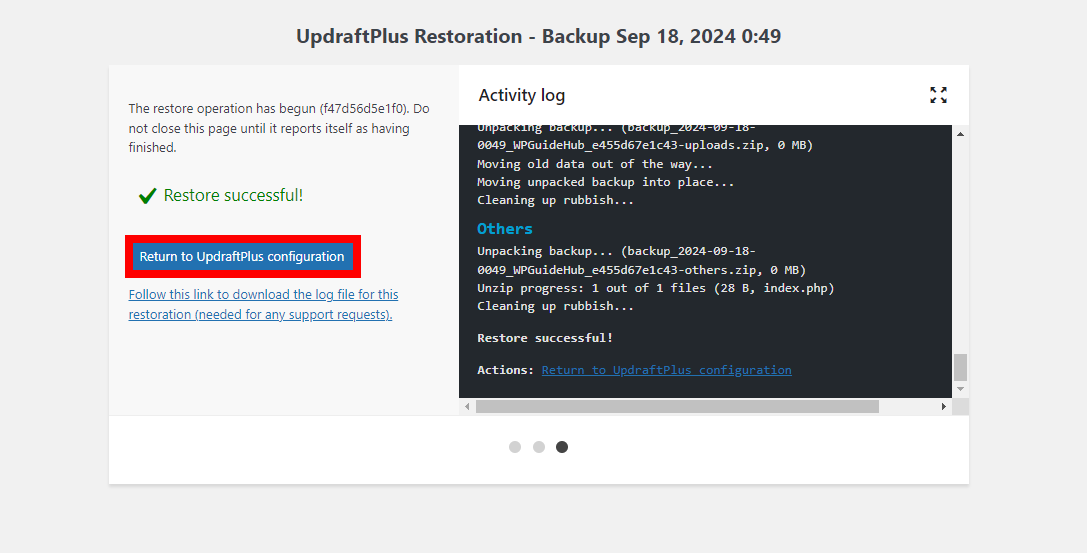
Once the restoration is complete, click the “Return to UpdraftPlus Configuration” button.
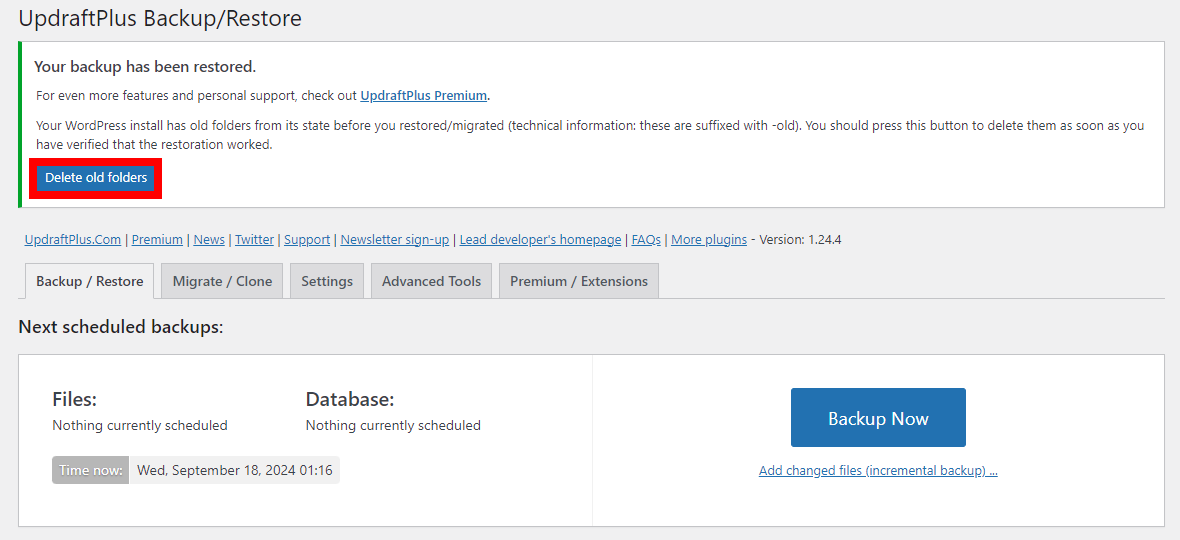
After that, you’ll be taken back to the UpdraftPlus Backup/Restore page. From there, click the “Delete Old Folders” button to remove any unused old folders. Once that’s done, be sure to check your website to make sure everything is running smoothly.
Conclusion
Using UpdraftPlus to back up and restore your WordPress site is a simple and effective way to keep your content safe. Setting up automatic backups and storing them in remote locations ensures that your site is protected with minimal effort. Plus, if you encounter any issues or decide to switch hosting providers, restoring your site is just a few clicks away.
For those looking for an even more streamlined experience, consider using Managed WordPress Hosting from Nexcess. Their service includes built-in backup solutions, so you can restore your site quickly and easily whenever you need to. Imagine having the peace of mind that comes with knowing you can get your site back up and running with just a few simple clicks.
Nexcess also offers incredible features like maximum speed with free Object Cache Pro, premium image compression, and a global Cloudflare CDN, ensuring your site runs smoothly and efficiently. With intelligent plugin update tools, you’ll benefit from visual comparisons and performance monitoring, helping you keep everything in check without a hassle.
You won’t have to worry about overage fees, traffic limits, or metered pageviews, giving you the freedom to grow your site without restrictions. Plus, every plan includes free migrations and a 30-day money-back guarantee, making it easy to switch without any risks.
On top of that, you’ll get proactive server monitoring and support from WordPress experts 24/7/365, ensuring you have assistance whenever you need it. And with more PHP flexibility than any other WordPress host, Nexcess allows you to tailor your environment to fit your specific needs.
